
How to get a Russian tourist visa
/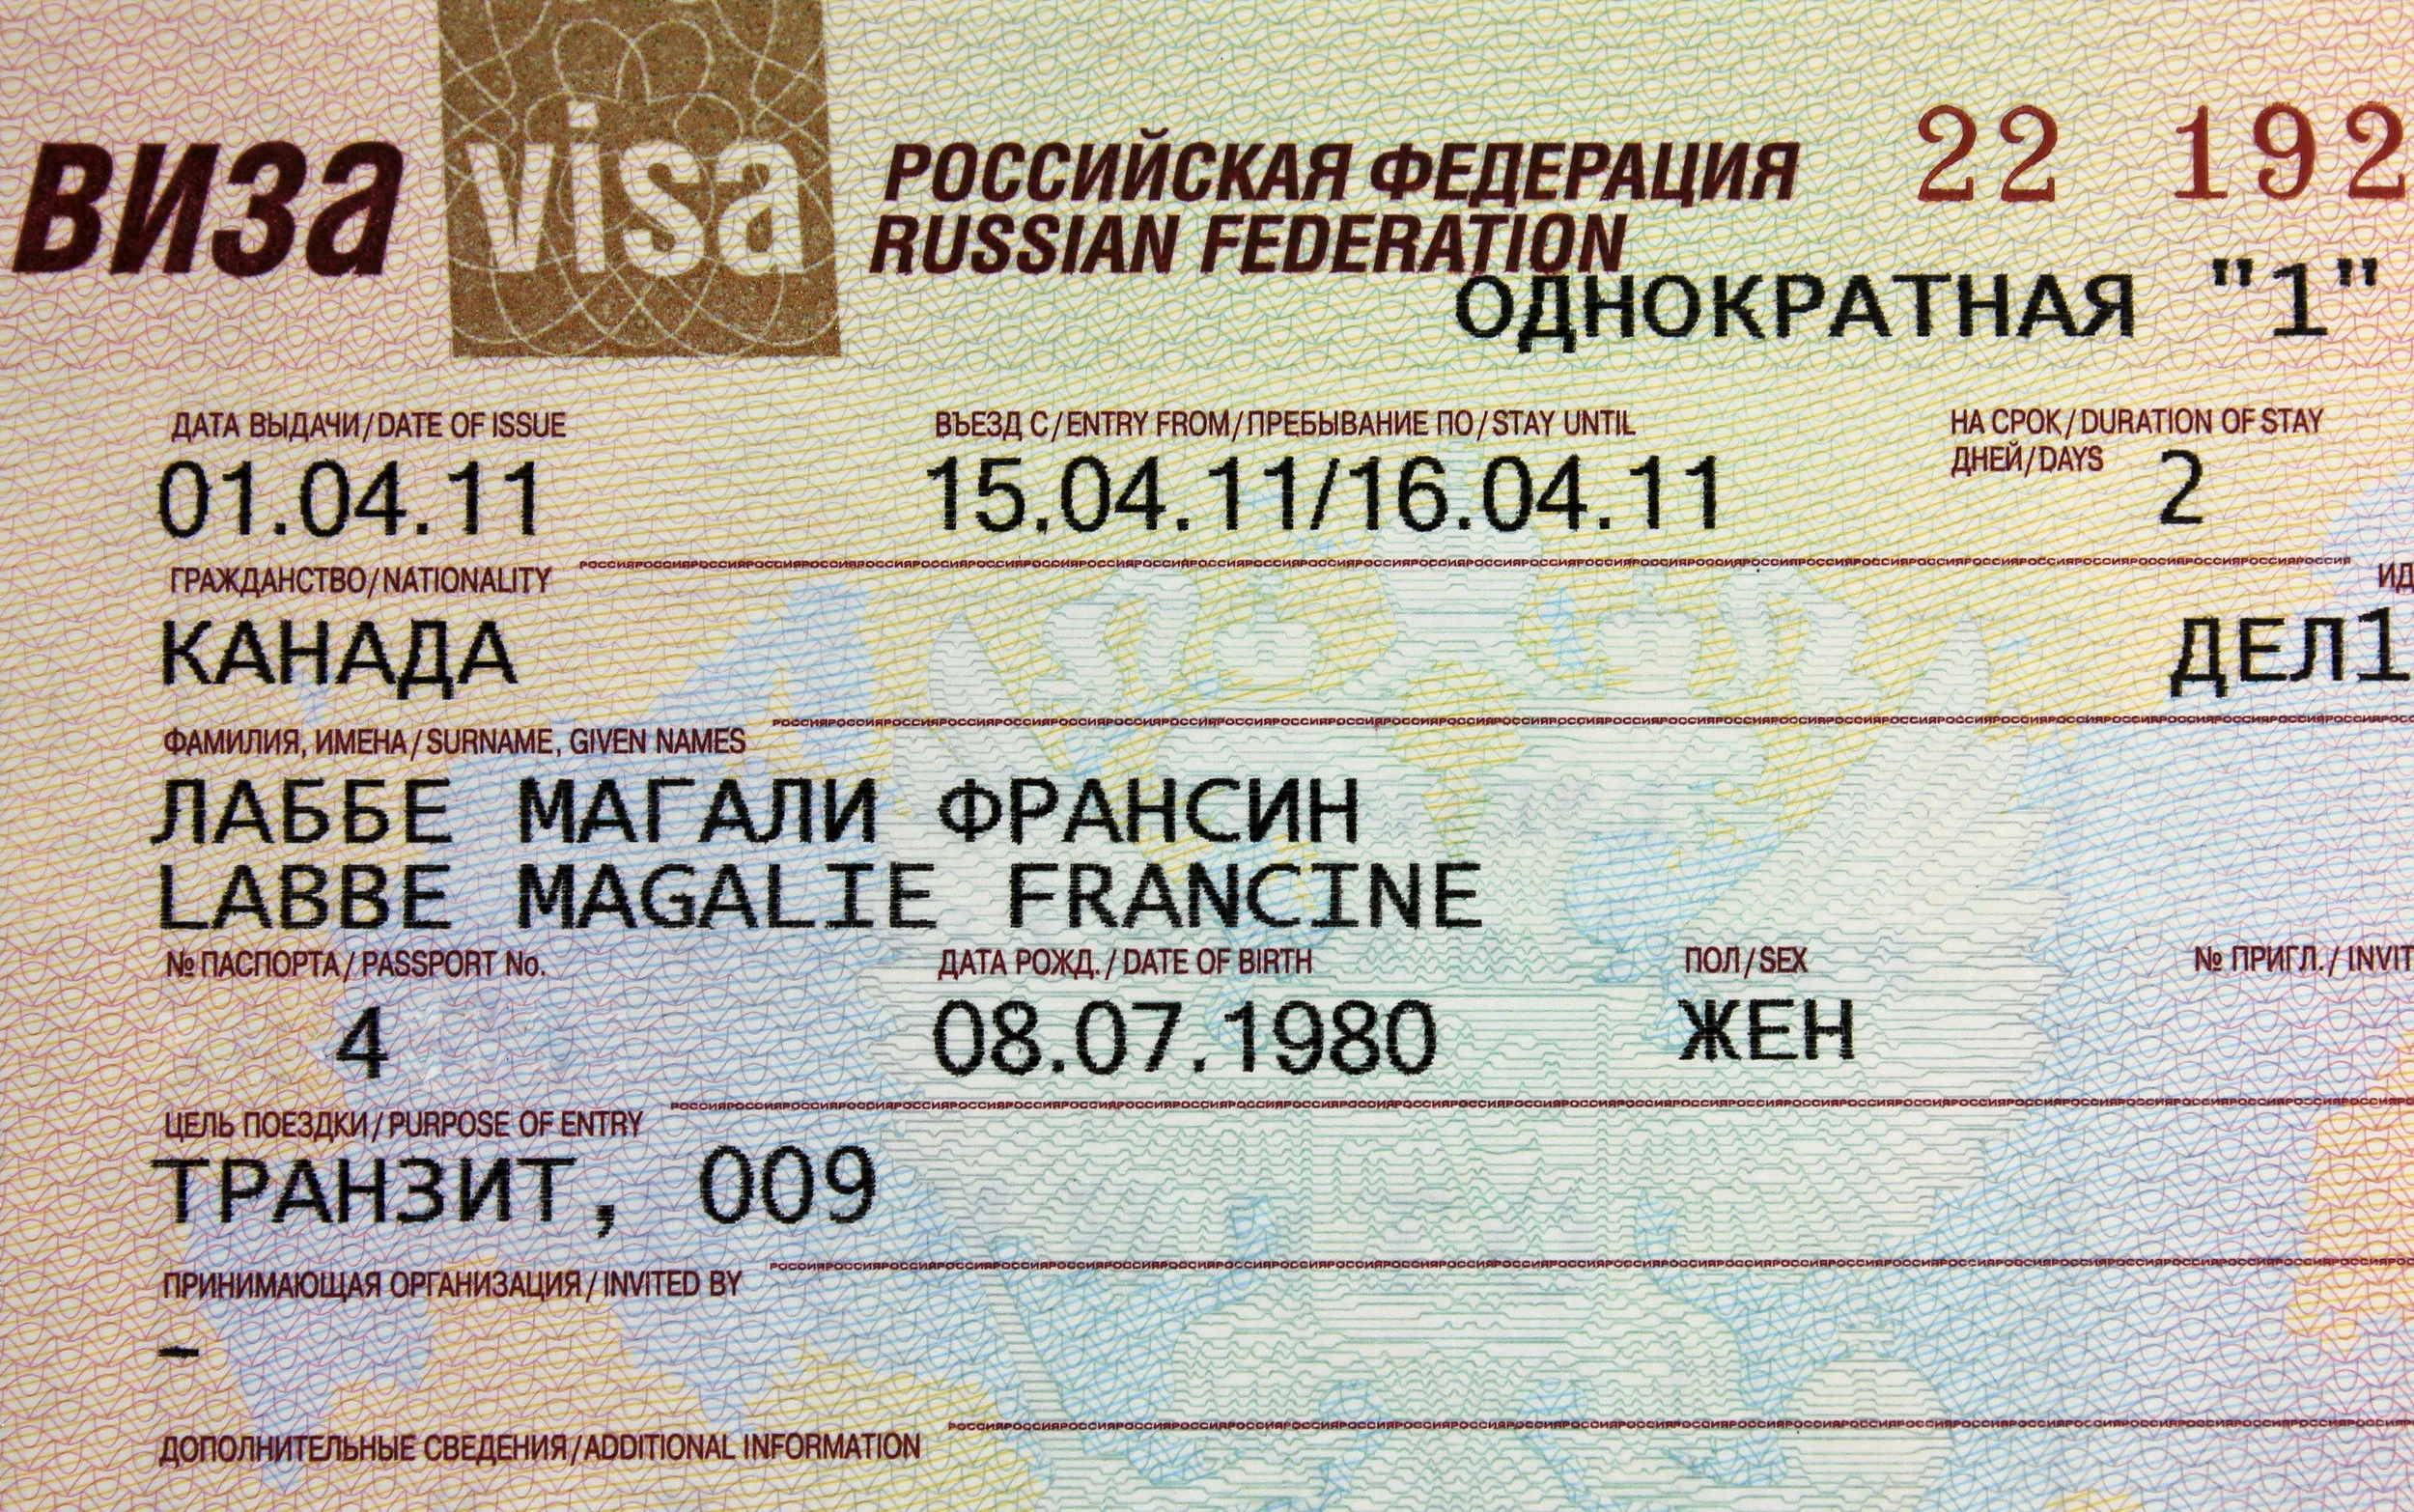
A Russian transit visa. Image credit: Magalie L'Abbé/Flickr
Note: This post contains sponsored content and/or links.
Russia is the world’s biggest country and is amongst the world’s most-visited, attracting millions of visitors from all over the world each year. Its two main tourist destinations are its capital Moscow, and the distinctly European Saint Petersburg.
In 2018, Russia’s tourism numbers will skyrocket thanks to the country hosting the FIFA World Cup, as fans who hold a match ticket and a valid fan ID card for the event will not be required to obtain a visa prior to travel, the same benefit that cruise ship passengers are granted.
But those travelling to the vast nation from much of Europe, including the United Kingdom will first need to acquire a visa before being granted entry.

Looking out towards the Kremlin's helipad in Moscow.
The process of acquiring a Russian tourist visa is both interesting and confusing, and is an apparent ‘mirroring’ of the application that the United Kingdom employs for the process of granting Russian passport holders entry to the UK.
Here I’ll walk you through the process of how to submit an application for a Russian tourist visa and, hopefully, one that will be successful.
Getting started

Two British passports. Image credit: Karen Bryan/Flickr
In the UK, Russia have outsourced their visa processing to a company called VFS Global. Applications are made through this company and their website can be found here.
Due to the collection of biometric data in the form of finger and handprints at the point of submission, all applications must be made in person at one of the three Russian Visa Application Centres in London, Edinburgh and Manchester.
You’ll need about an hour to fill out the online application form, a passport valid for a minimum of six months after the period of the stay requested, a passport-sized photograph taken no longer than half a year ago and access to a printer in order to print off the form as well as your invitation.
Getting an invitation
Getting an invitation, or a visa supporting document as it is also known, is a mandatory part of applying for a Russian tourist visa.
To enter the Russian Federation, visitors will need to provide an official tourist invitation which will contain both the confirmation of your stay as well as an attached tourist voucher.
Your accommodation provider will be able to provide you this service and some of them may charge for it. Tourist vouchers are also available online.
Starting the application

Once you have your invitation, you’ll need to head over to the VFS Global website to start the visa application.
The first couple of pages are self-explanatory, and you’ll need to fill out details of your visit as well as your personal and passport details. For British passport holders, the “Issued by” field should contain ‘United Kingdom Identity & Passport Service (IPS).’
Visit details

The visit details regard your accommodation providers and the invitation that you should have previously acquired. The “reference number” can be found preceded by three letters in the bottom left of the invitation, while the “confirmation number” may be called “voucher number” and is located on the right hand side of your tourist invitation.
Last visit details
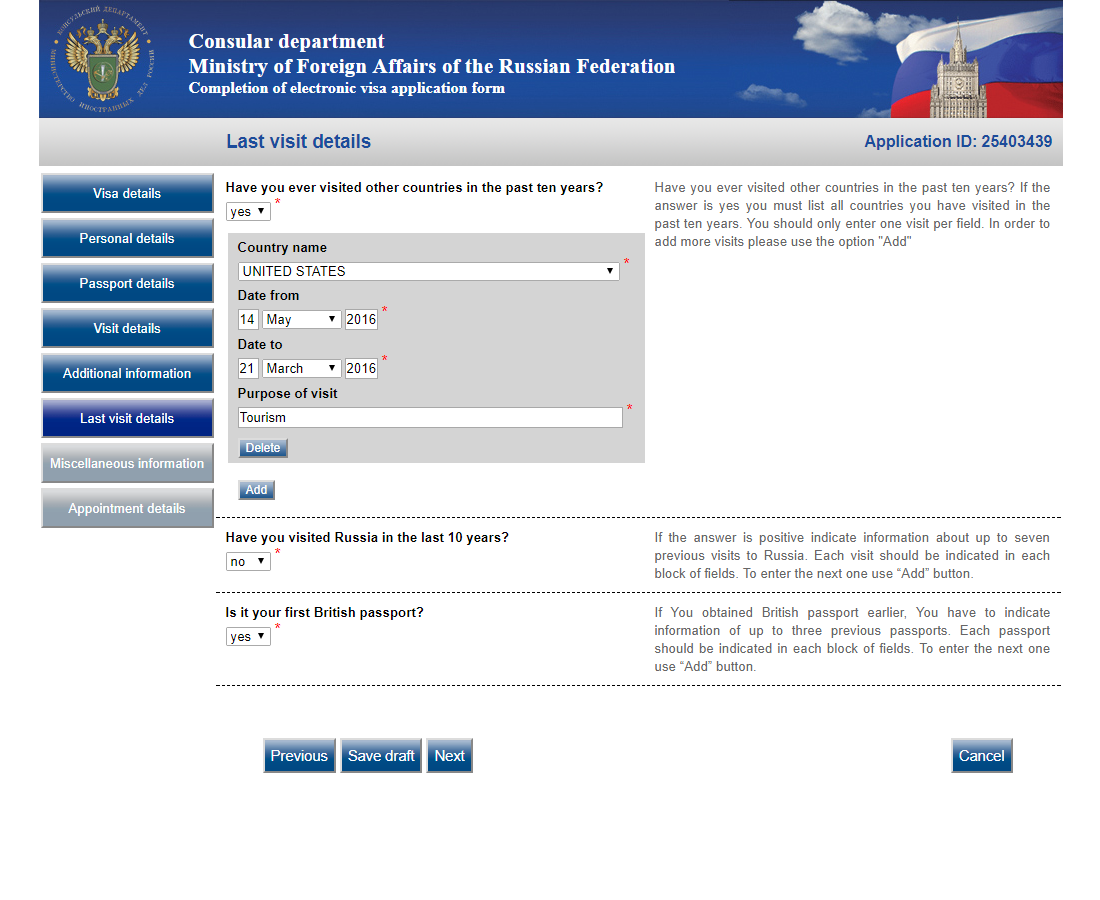
This is different to the visit details section in that it concerns previous visits. If you have visited Russia in the last 10 years then fill in the details, and if the other two questions look daunting, then here’s what you do…
“Have you ever visited other countries in the past ten years?”
While this seems like a fairly straightforward and closed question, the folks who created these it have turned a simple yes or no into a painful task.
Unless it’s a “no,” in addition to answering “yes” you will need to provide the name of the countries you have visited in the past decade, including the dates and purpose of your visit. Not only is it a frustrating process for those who have visited a lot of places in that timeframe, but they have also limited the answer to 10 fields, meaning that if you have made trips to more than 10 countries in as many years then you can’t fully provide the answer that they are looking for.
The strategy that I employed was to list the trips from which I had stamps in my passport, and did so in reverse chronological order. I ended up missing out the oldest ones and it seemed to do the trick.
For countries that Russia don’t recognise, list them as the nations that the Russian Federation considers them to fall under. For example, I have a Kosovo stamp in my passport which I got in August 2017, from a visit which I listed as ‘Serbia’ on my successful application.
Unless you went for a specific reason such as to work and/or study, then simply put “tourism” as the purpose for your visit.
“Is it your first British passport?”
According to the website, if you have previous passports then you have to indicate information for up to three of them. There’s little to no chance that you will have any of your former passports lying around the house, but you don’t need to panic.
I had the spoiled passport that I wrecked before getting my current one, so I was able to input the details from my previous passport. If you actually have access to any of your old passports then you may as well use them to answer this question.
However, if you only have your current passport and no longer own any of your previous ones, then answer “yes,” even if it isn’t your first one. My girlfriend had this dilemma, gave that answer and got the visa without a hitch.
Miscellaneous information
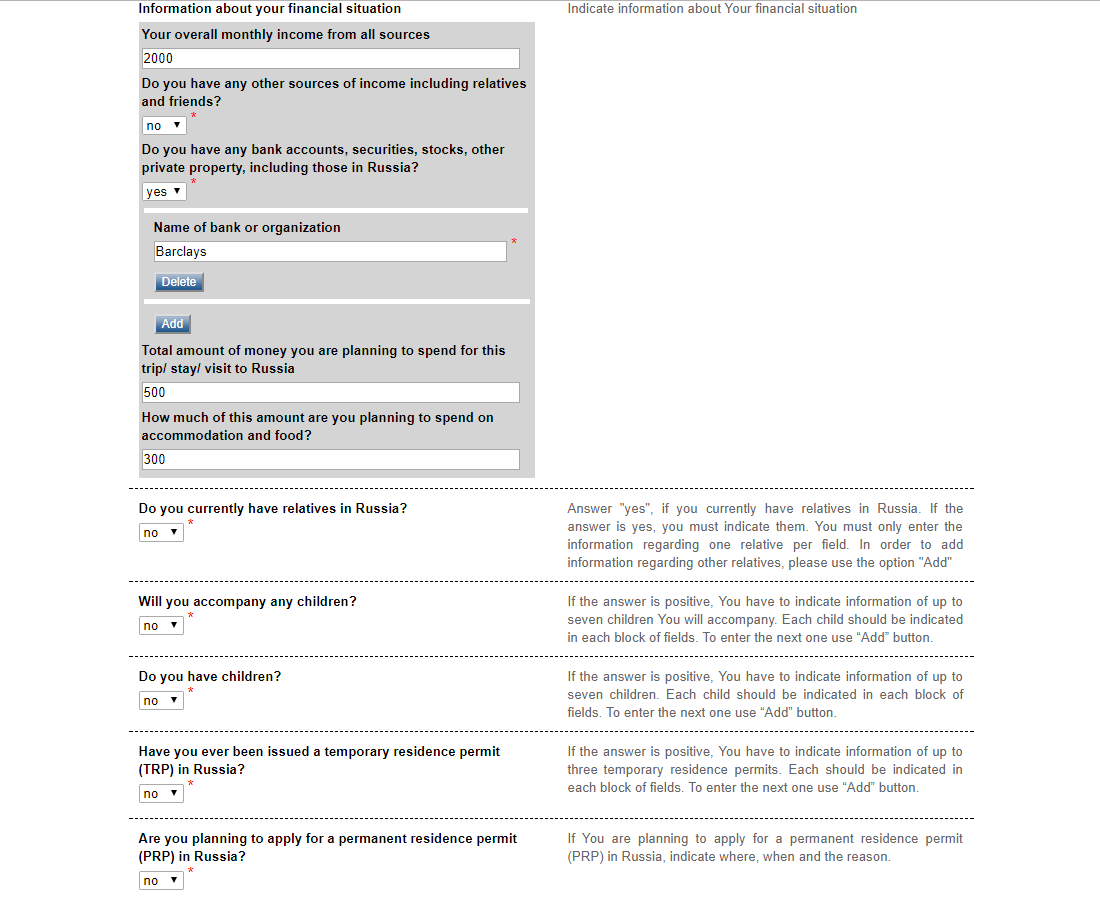
The miscellaneous information may seem a little intrusive, but it’s just part and parcel of the Russian visa application process. You will be asked to provide information on your parents and work, as well as basic financial information.
For “Do you have any bank accounts, securities, stocks, other private property, including those in Russia?,” answer yes, even if you only have a personal bank account in your home country, then just put the company with whom you bank. Monthly income and predicted spend don’t have to be exact, so you are okay to enter a round figure.
Finalising the application
The penultimate step of finalising your visa application is to select the location where you are going to reply. The options are the Visa Application Centres in London and Edinbugh, as well as the Consulate General of Russia in Edinburgh and the embassy of Russia in the United Kingdom. Choosing one is a straightforward process, although you need to select “Visa Application Center VFS UK (London)” if you will be applying in Manchester.
You will then be given the opportunity to review your application prior to submission. Take your time and read things slowly in order to make sure that everything is correct and proper. Once you have submitted the application, you’ll see a screen from which you can print the application out and save a PDF copy.
Submitting the application and collection
Applications will need to be made at the location specified, and normal applications will take around five working days to be processed. For applications submitted in London and Edinburgh, a next working day service is provided at additional cost, although this isn’t offered to those applying in Manchester.
Payment for the visa, administration fees and delivery costs, if applicable, are taken at the application centre on the day and cash, as well as debit and credit cards, with the exception of American Express, are accepted.
Every application comes with the option of having the passport returned via DX Secure delivery for a charge, which includes insurance, and can be delivered to an address of your choosing, whether that is home, work or elsewhere. This is mandatory for Manchester applicants, while other locations have a pickup facility. Applications and delivery can be tracked here.
NOTE: The above steps are those which my girlfriend and I took to get our Russian tourist visas in November 2017. This is a guide offering advice and suggestions based on two successful Russian tourist visa application, and this blog will not be held accountable for any visa rejections. Make sure to also read all of the information on the VFS Global website prior to beginning your application and excercise care and consideration when putting your application together.
American passport holders
Those with passports from the United States of America will have a different experience to what's outlined above, but Travel Visa Pro offer a comprehensive and streamlined service for your Russian visa application, with an official invitation letter sent less than five minutes after completing your application!
It's a quick and easy way to help ensure you obtain your visa successfully, with Travel Visa Pro doing all the hard work for you.


In 2019, UNESCO released the names of several places to be granted World Heritage Status, yet some still haven’t made the cut. Here are six travel destination that should be UNESCO World Heritage Sites.